EN76/EN96 Villamos motorvonat
A szócikk EN76/EN96 (Pesa Elf) villamos motorvonatról szól.

A motorvonat a valóságban
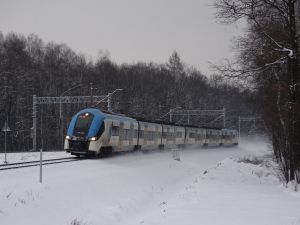
Az Elf (Electric Low Floor) egy többfunkciós monotorvonat, melyet a lengyel Pesa SA. járműgyártó fejlesztett ki. A jármű elővárosi és regionális közlekedésre van tervezve, padlómagassága a sínkorona tetejétől 55cm. A jármű a korábban kifejlesztett ED59 és az ED74 sorozatokon alapul. A típust legelőször a 2010-es berlini InnoTrans rendezvény keretein belül mutatta be a gyártó. 2016-ban új verziót mutattak be, ez volt az Elf 2, mely megjelenésében is új volt. Majd 2019-ben egy újabb generáció, az Elf.eu is bemutakozott több funkcióval kibővítve, melyet az európai vasúti piacra szánt a gyártó [1].
A jármű a játékban

A játékban ez volt az első villamos motorvonat, mely a demóverzióba került be. A jármű kiárólag személyvonatokon található meg.
Jelenleg van EN76 és EN96 a játékban, az EN76 sorozat elsősorban Varsó, míg az EN96 inkább Katowice elővárosában lelhető fel.
Az alábbi pályaszámú egységek vezethetőek:
- EN76-006
- EN76-022
- EN96-001
A jármű alaptulajdonságai
- Maximum speed in the game is 120 Km/h
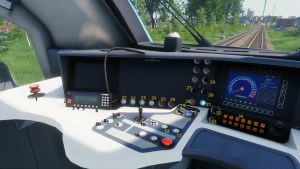
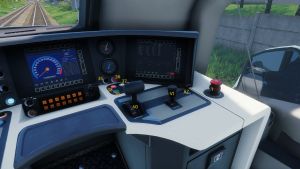
A motorvonat vezetőállása


| 1. | Vészfék ütőgomb | 22. | Funkcióval nem rendelkező kapcsoló |
| 2. | Rádió szünet | 23. | Funkcióval nem rendelkező kapcsoló |
| 3. | Rádió kikapcsoló | 24. | Funkcióval nem rendelkező kapcsoló |
| 4. | ZEW1 (rádiógomb) | 25. | Funkcióval nem rendelkező kapcsoló |
| 5. | ZEW3 (rádiógomb) | 26. | Funkcióval nem rendelkező kapcsoló |
| 6. | Rádió bekapcsoló | 27. | Első áramszedő |
| 7. | Ajtónyitás-vezérlő | 28. | Főmegszakító |
| 8a. | Ajtónyitás | 29. | Éberségi figyelmeztető tompítása |
| 8b. | Ajtózárás | 30. | Hátsó áramszedő |
| 9. | Ajtó alatti guruló lépcső | 31. | Sebességszabályzó automatika bekapcsolása |
| 10. | Kürt | 32. | Vezetőállás aktíválókapcsoló |
| 11. | Kürt (magas hang) | 33. | Lecsatlakozás (csatolt egységek esetén) |
| 12. | Kürt (mély hang) | 34. | Sebességszabályzó automatika (sebességválasztó) |
| 13. | Síp | 35. | Főlégvezeték tömörségi vizsgálat |
| 14. | Műszerfal világítás | 36. | Főlégvezeték töltése |
| 15. | Homokoló | 37. | Fékhenger nyomáskiegyenlítés |
| 16. | Éberségi nyomógomb | 38. | Rugóerőtáróló fék aktiválása |
| 17. | Fényszóró fénytompítás | 39. | Rugóerőtároló fék deaktiválása |
| 18. | Ablakmosó | 40. | Menetszabályzó kontroller (kombinált) |
| 19. | Fényszóró módkapcsoló | 41. | Rögzítőfék |
| 20. | Ablaktörlő | 42. | Irányváltó kapcsoló |
| 21. | Funkcióval nem rendelkező kapcsoló | 43. | Géptér világítás |
| 44. | Vezetőasztal világítás |
Cold start locomotive start procedure
- Open the battery cover and switch on the batteries, then close the battery cover.
- Click on the door and enter the unit.
- Click on the cab door and enter the driver's cab.
- Click on the driver's seat and sit behind the console.
- Now activate the cab by switching the button to "cab active on one unit"
- Confirm the vigilance button.
- Raise the rear pick-up
- Wait for the power to come on.
- Turn on the HV (main power switch) - Hold the button for a few seconds.
- Wait for the unit to come back to life and the compressors to kick in.
- Click the ZEW3 button on the radio to confirm the train is ready to the dispatcher.
- Switch the train lights to the running position
- Deactivate the train's handbrake.
- Select the direction of travel of the train - Forward
- Then release the handbrake by switching to the "Release Brake" position
- Shift the controller one position forward or press the Num + key
- Hold down the brake release button, and hold the button until the braking force is at 0%.
- Now it's time to go. Move the controller forward, or press and hold the Num+ key to start the train.
- Press the vigilance button to deactivate the SHP
- Press the Num- key or move the controller back one position, the train will not accelerate but will run without power.
- Press and hold the Num- key and the unit will start braking using the electrodynamic brake. The longer the key is held, the more the unit brakes.
- After stopping, release the door lock and select which doors the passengers can open.
- Or we can open the door ourselves.
- After all the passengers have boarded, we lock the doors.
- Use the Num+ key to unblock the train.
- Press and hold the Num+ key again to add power.
Unit malfunctions
The unit currently has no malfunctions.
Gallery
- Screenshots from the game (without zoom)
-
EN76, Image by Exiter
-
EN96, Screenshot by Smokey
-
EN76, Image by Roman
-
EN76, Author of this image Roman
-
EN76, Author Roman
Reference
- [1] - Wikipedia link


