ET25 Villanymozdony
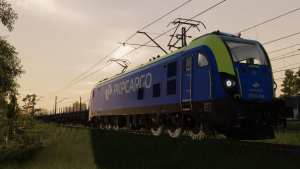
Ez a villanymozdonysorozat az ET25, melyet Dragon néven ismerünk, és Lengyelországban gyártanak.

A mozdony a valóságban
Newag Dragon is a family of six-axle locomotives manufactured by the Polish manufacturer Newag Gliwice since 2009. Of the modifications offered, only electric DC locomotives are in service in 2015.
The locomotive was created as a joint project of the locomotive repairer Zakłady Naprawcze Lokomotyw Elektrycznych (ZNLE) (later Newag Gliwice) in cooperation with Instytut Elektrotechniki Warszawa and the design office EC Engineering. The locomotive was developed in response to specific Polish conditions, where operators prefer heavy trains, for which a six-axle locomotive is more suitable than the more common four-axle locomotives in Western Europe (e.g. Siemens EuroSprinter or Bombardier TRAXX).[1]
A mozdony paraméterei
| Traction | Electric | Maximum teljesítmény | DC 5000 kW / AC&MS 7200 kW |
|---|---|---|---|
| Dízelmotor típusa | STX500-4A
ABB AMXL450 |
Maximum vonóerő | 375-450 kN |
| Vontatómotorok száma | 6 | Maximum sebesség | 120 Km/h |
| Áramnem | DC 3 kV
AC duális üzemmód 15 kV & 25 kV MS tripla üzemmód 3 kV DC 15 kV & 25 kV AC |
||
A mozdony a játékban

A mozdony a játék korai hozzáférési szakaszában került be, és tehervonatok élén találkozhatnak vele a játékosok.
Az alábbi pályaszámú járművek vezethetőek a játékban:
- EP25-002
A jármű alap paraméterei
- Maximum sebesség: 120 Km/h
- A jármű dízelmotoros üzem esetén 40 Km/h sebességre képes (elsősorban tolatáshoz, és fűtőházi mozgáshoz)
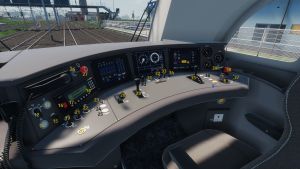
A mozdony vezetőállása


| 1. | Funkcióval nem rendelkezik | 21. | Első áramszedő | ||||
| 2. | Funkcióval nem rendelkezik | 22. | Főmegszakító | ||||
| 3. | Tűzjelző teszt | 23. | Fényszóró beállítás | ||||
| 4. | Tűzvédelmi riasztás törlése | 24. | Lábtámasz leengedése | ||||
| 5. | Géptérvilágítás | 25. | Lábtámasz felemelése | ||||
| 6. | Rugóerőtároló aktiválása | 26. | Vezetőállás aktiválása | 7. | Rugóerőtároló fék deaktiválása | 27. | Vészleállítás |
| 8. | Mozdonyfék | 28. | Sebesség alapjeladó kar | ||||
| 9. | Éberségi nyomógomb | 29. | Menetszabályzó kontroller | ||||
| 10. | Kürt (magas) | 30. | Homokoló | ||||
| 11. | Vezetőállás világítása | 31. | Főlégvezeték töltő | ||||
| 12. | Ablaktörlő | 32. | Fényszóró fénytompítás | ||||
| 13. | Ablakmosó | 33. | Vezérlőpanel világítás | ||||
| 14. | Vezérlőpanel világítás | 34. | Műszerfal fénytompítás | ||||
| 15. | Műszerfal fénytompítás | 35. | Vonatfék | ||||
| 16. | Radió stop | 36. | Irányváltó | ||||
| 17. | Rádió kikapcsolása | 37. | Kürt | ||||
| 18. | Rádió bekapcsolása | 38. | Vészfék ütőgomb | ||||
| 19. | Hátsó áramszedő | 39. | Gép kitaposása | ||||
| 20. | ETCS |
Hidegindítási eljárás (felsővezetékes üzem estén)
- Lépj be a vezetőállásra
- Aktiváld a vezetőállást
- Press the button to confirm alertness
- Raise rear manifold
- Turn on the HV switch and hold the button for a moment.
- Turn on the radio station
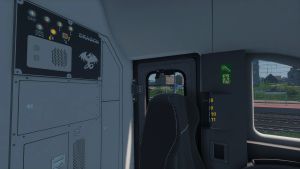
- Now, switch off the locomotive handbrake, where the button is located on the rear wall of the cab.
- Switch the lights to the forward position.
- Set the train's direction of travel - Forward
- Switch and hold the brake in the "Reduce braking force" position and wait until the braking force is at 0%.
- Click ZEW3 button on the radio to confirm the train is ready to the dispatcher.
- Now it's time to move. Either use the controller (left) or the Num + key to add power.
- Using the Num - key or reducing power on the controller will reduce the locomotive power and then we can brake the train or apply the electrodynamic brake.
Hidegindítási eljárás dízelmotoros üzem esetén
- Lépj be a vezetőállásra
- Aktiváld a vezetőállást
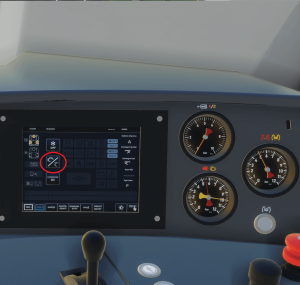
- A jobb oldali monitor - állítsd be a dízelmotoros/felsővezetékes üzemmódot
- Turn on the HV switch and hold the button for a moment.
- Kapcsold be a rádiót
- Now, switch off the locomotive handbrake, where the button is located on the rear wall of the cab.
- Switch the lights to the forward position.
- Set the train's direction of travel - Forward
- Switch and hold the brake in the "Reduce braking force" position and wait until the braking force is at 0%.
- Click ZEW3 button on the radio to confirm the train is ready to the dispatcher.
- Now it's time to move. Either use the controller (left) or the Num + key to add power.
- Using the Num - key or reducing power on the controller will reduce the locomotive power and then we can brake the train or apply the electrodynamic brake.
A mozdony üzemeltetése
The locomotive is currently free of any faults.
Galéria
- Képernyőképek a játékból (fókusz nélkül)
Hivatkozások
- [1] - Wikipedia link


