DLC CD 163/es: Difference between revisions
Updating to match new version of source page |
Updating to match new version of source page |
||
| Line 58: | Line 58: | ||
==Fallos de la locomotora== | ==Fallos de la locomotora== | ||
*'''n/a''' | *'''n/a''' | ||
</div> | |||
<div lang="en" dir="ltr" class="mw-content-ltr"> | |||
'''ARR control''' | |||
# Turn on the ARR first. In "manual" mode, you control the proportional thrust with the drive controller, while in ARR mode, the computer takes over the power control to achieve the selected speed. | |||
# Setting the target speed Use the ARR keyboard to select the desired speed. Using the drive controller, it is possible to adjust the desired speed by approximately 2 km/h. The value is shown on the speedometer display. | |||
# Thrust limitation switch: Use the switch to adjust the speed at which proportional thrust is applied. In poor traction conditions (rain, ice), set a lower value to prevent the wheels from slipping. | |||
# Starting: To start in ARR mode, follow this specific procedure: - After setting the desired speed and moving the direction lever to the "Forward" position, hold the driving mode in the "S" (Start) position until the locomotive reaches 5 km/h. | |||
</div> | </div> | ||
| Line 70: | Line 78: | ||
<div lang="en" dir="ltr" class="mw-content-ltr"> | <div lang="en" dir="ltr" class="mw-content-ltr"> | ||
''' | * '''Not an Autopilot:''' It is important to remember that ARR is '''not''' an autopilot designed for stopping at stations. | ||
</div> | |||
<div lang="en" dir="ltr" class="mw-content-ltr"> | |||
Before using the automatic train brake, move the Drive Mode switch to the V (Coast) position. | |||
</div> | |||
<div lang="en" dir="ltr" class="mw-content-ltr"> | |||
==Locomotive Cold start procedure== | |||
1. Switch on the batteries | |||
</div> | |||
<div lang="en" dir="ltr" class="mw-content-ltr"> | |||
2. Open the pantograph shut-off valves | |||
</div> | |||
<div lang="en" dir="ltr" class="mw-content-ltr"> | |||
3. Activate the cab | |||
</div> | |||
<div lang="en" dir="ltr" class="mw-content-ltr"> | |||
4. Switch on the auxiliary compressor (set compressor switch 1 to the PK position) | |||
</div> | |||
<div lang="en" dir="ltr" class="mw-content-ltr"> | |||
''Wait for the auxiliary compressor to switch off automatically'' | |||
</div> | |||
<div lang="en" dir="ltr" class="mw-content-ltr"> | |||
5. Switch on the 115 V central power supply | |||
</div> | |||
<div lang="en" dir="ltr" class="mw-content-ltr"> | |||
6. Use the Override Protection button | |||
</div> | |||
<div lang="en" dir="ltr" class="mw-content-ltr"> | |||
7. Set the collector grounding switch to the P+Z position if there is no collector malfunction on the locomotive | |||
</div> | |||
<div lang="en" dir="ltr" class="mw-content-ltr"> | |||
8. Turn on the main switch (HV) | |||
</div> | |||
<div lang="en" dir="ltr" class="mw-content-ltr"> | |||
9. Raise the pantographs | |||
</div> | |||
<div lang="en" dir="ltr" class="mw-content-ltr"> | |||
10. Switch on compressor 2 | |||
</div> | |||
<div lang="en" dir="ltr" class="mw-content-ltr"> | |||
''Wait until the pressure in the main reservoir reaches 5 bar'' | |||
</div> | |||
<div lang="en" dir="ltr" class="mw-content-ltr"> | |||
11. Switch off the auxiliary compressor and switch on compressor 1 | |||
</div> | |||
<div lang="en" dir="ltr" class="mw-content-ltr"> | |||
Wait for the compressors to switch off automatically | |||
</div> | |||
<div lang="en" dir="ltr" class="mw-content-ltr"> | |||
12. Turn on the radio | |||
</div> | |||
<div lang="en" dir="ltr" class="mw-content-ltr"> | |||
1e. Apply the auxiliary (locomotive) brake | |||
</div> | |||
<div lang="en" dir="ltr" class="mw-content-ltr"> | |||
14. Release the train brake and fill the main pipe | |||
</div> | |||
<div lang="en" dir="ltr" class="mw-content-ltr"> | |||
15. Release the hand brakes | |||
</div> | |||
<div lang="en" dir="ltr" class="mw-content-ltr"> | |||
16. Adjust the lights | |||
</div> | |||
<div lang="en" dir="ltr" class="mw-content-ltr"> | |||
17. Set the direction of travel to forward | |||
</div> | |||
<div lang="en" dir="ltr" class="mw-content-ltr"> | |||
The locomotive is ready to move. | |||
</div> | |||
<div lang="en" dir="ltr" class="mw-content-ltr"> | |||
''Instructions taken from the TSC game and may differ slightly in the game, will be corrected. Author of instructions: Maty'' | |||
</div> | </div> | ||
| Line 100: | Line 199: | ||
==Referencia== | ==Referencia== | ||
*[https://cs.wikipedia.org/wiki/Lokomotiva_163 <nowiki>[1]</nowiki>] – Enlace a Wikipedia (CZ) | *[https://cs.wikipedia.org/wiki/Lokomotiva_163 <nowiki>[1]</nowiki>] – Enlace a Wikipedia (CZ) | ||
</div> | </div> | ||
| Line 146: | Line 205: | ||
{| class="wikitable" | {| class="wikitable" | ||
! colspan="2" | | ! colspan="2" | | ||
|- | |||
|'''Model author:''' | |||
|Javor (CZ) | |||
|- | |- | ||
|'''Date of announcement:''' | |'''Date of announcement:''' | ||
| Line 152: | Line 214: | ||
|'''Release date:''' | |'''Release date:''' | ||
|25.01.2026 | |25.01.2026 | ||
|- | |- | ||
|'''Price:''' | |'''Price:''' | ||
Revision as of 10:18, 18 January 2026
En esta página faltan información y detalles debido a la falta de disponibilidad, lo que significa que dicha información puede no ser precisa al 100% .

La locomotora en la realidad
La locomotora de la serie 163, derivada de la serie 363, se basa en la necesidad de operar en líneas con tensión de 3 kV CC. A principios de la década de 1980, la situación en el transporte ferroviario comenzó a cambiar, dado que en 1985 debían eliminarse gradualmente las locomotoras de las series 140 y 141 y no había suficientes unidades de reemplazo. Esto llevó a Škoda a poner en marcha una nueva serie de locomotoras capaces de funcionar con tracción DC. Aunque nunca se construyó un prototipo de la serie 163, se utilizaron prototipos de las locomotoras ES 499.1 de dos sistemas (la actual serie 363) para su desarrollo. Por lo tanto, las locomotoras de la serie 163 forman parte de la llamada segunda generación de locomotoras Škoda.
La producción de las locomotoras de la serie 163 tuvo lugar entre 1984 y 1986 (designación de fábrica 71E) y más tarde entre 1991 y 1992 (99E), en la empresa Škoda en Pilsen en cooperación con ČKD Polovodiče. Además de las locomotoras de nueva producción, se construyeron varias unidades de la serie 163 como resultado del cambio de chasis de la serie 363 a la serie 162 entre 1993 y 2008. Estas locomotoras se utilizan en la República Checa, Eslovaquia y anteriormente en Italia para transportar trenes de pasajeros y mercancías. Al mismo tiempo, las locomotoras de la serie 163 siguen activas y cumplen con éxito su papel de locomotoras de línea universal. Algunas de estas locomotoras fueron arrendadas previamente a Polonia, desde donde regresaron a la República Checa a finales de 2015.
Parámetros de la locomotora
| Tracción | Eléctrica | Potencia máxima | 3480 kW |
|---|---|---|---|
| Tipo de motor | AL 4562 FiR | Velocidad máxima | 120 Km/h |
| Voltaje | 3kV AC | Peso | 85 t |
La locomotora en el juego

El desarrollo de esta locomotora fue anunciado el 12.12.2023 y “estará disponible como contenido descargable (DLC) en el juego.
Números de serie que se pueden conducir:
- 163 041-7
Parámetros básicos de esta locomotora
- Velocidad máxima de 120 Km/h
- La locomotora carece de ETCS.
Procedimiento de arranque "en frío" de la locomotora
- n/a
Fallos de la locomotora
- n/a
ARR control
- Turn on the ARR first. In "manual" mode, you control the proportional thrust with the drive controller, while in ARR mode, the computer takes over the power control to achieve the selected speed.
- Setting the target speed Use the ARR keyboard to select the desired speed. Using the drive controller, it is possible to adjust the desired speed by approximately 2 km/h. The value is shown on the speedometer display.
- Thrust limitation switch: Use the switch to adjust the speed at which proportional thrust is applied. In poor traction conditions (rain, ice), set a lower value to prevent the wheels from slipping.
- Starting: To start in ARR mode, follow this specific procedure: - After setting the desired speed and moving the direction lever to the "Forward" position, hold the driving mode in the "S" (Start) position until the locomotive reaches 5 km/h.
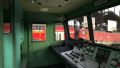
Galería de imágenes
- Capturas del juego
-

-
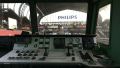
-

- Not an Autopilot: It is important to remember that ARR is not an autopilot designed for stopping at stations.
Before using the automatic train brake, move the Drive Mode switch to the V (Coast) position.
Locomotive Cold start procedure
1. Switch on the batteries
2. Open the pantograph shut-off valves
3. Activate the cab
4. Switch on the auxiliary compressor (set compressor switch 1 to the PK position)
Wait for the auxiliary compressor to switch off automatically
5. Switch on the 115 V central power supply
6. Use the Override Protection button
7. Set the collector grounding switch to the P+Z position if there is no collector malfunction on the locomotive
8. Turn on the main switch (HV)
9. Raise the pantographs
10. Switch on compressor 2
Wait until the pressure in the main reservoir reaches 5 bar
11. Switch off the auxiliary compressor and switch on compressor 1
Wait for the compressors to switch off automatically
12. Turn on the radio
1e. Apply the auxiliary (locomotive) brake
14. Release the train brake and fill the main pipe
15. Release the hand brakes
16. Adjust the lights
17. Set the direction of travel to forward
The locomotive is ready to move.
Instructions taken from the TSC game and may differ slightly in the game, will be corrected. Author of instructions: Maty
Información del DLC
| Fecha del anuncio: | 12.12.2023 |
| Fecha de distribución: | n/a |
| Desarrollador: | Javor (CZ) |
| Precio: | n/a |
| El DLC incluirá: | 163 041-7 |
Referencia
- [1] – Enlace a Wikipedia (CZ)
DLC Info
| Model author: | Javor (CZ) |
| Date of announcement: | 12.12.2023 |
| Release date: | 25.01.2026 |
| Price: | 14 € |
| DLC will include: | 1 model / 11 reskins |
| Link to store: | Buy here |
Reference
- [1] – Wikipedia link (CZ)