Electric locomotive ET25: Difference between revisions
ProDumanniy (talk | contribs) Tags: Reverted Visual edit |
No edit summary Tag: Undo |
||
| Line 12: | Line 12: | ||
==Locomotive parameters== | ==Locomotive parameters== | ||
{| class="wikitable" | {| class="wikitable" | ||
! | !Traction | ||
|Electric | |Electric | ||
! | !Maximum power | ||
|DC 5000 kW / AC&MS 7200 kW | |DC 5000 kW / AC&MS 7200 kW | ||
|- | |- | ||
! | !Engine type | ||
|STX500-4A | |STX500-4A | ||
ABB AMXL450 | ABB AMXL450 | ||
! | !Maximum traction force | ||
|375-450 kN | |375-450 kN | ||
|- | |- | ||
! | !Number of motors | ||
| 6 | | 6 | ||
! | !Maximum speed | ||
|120 Km/h | |120 Km/h | ||
|- | |- | ||
! | !Voltage | ||
|DC 3 kV | |DC 3 kV | ||
AC dual mode 15 kV & 25 kV | AC dual mode 15 kV & 25 kV | ||
| Line 38: | Line 38: | ||
This electric locomotive in the game was added in the EA (Early Access) version, and players can run this locomotive as part of freight trains. | This electric locomotive in the game was added in the EA (Early Access) version, and players can run this locomotive as part of freight trains. | ||
'' | ''Serial numbers of locomotives that can be driven:'' | ||
* ''EP25-002''<span id="Základní_parametry_této_lokomotivy"></span> | * ''EP25-002''<span id="Základní_parametry_této_lokomotivy"></span> | ||
===== | ===== Basic parameters of this locomotive ===== | ||
* | *Maximum speed 120 Km/h | ||
* | *Can be driven up to 40 Km/h on diesel power | ||
== | == Interior of the locomotive == | ||
[[File:et25 tlacitka1.jpg|center|thumb|[[File:et25 tlacitka2.jpg|thumb]]]] | [[File:et25 tlacitka1.jpg|center|thumb|[[File:et25 tlacitka2.jpg|thumb]]]] | ||
{| class="wikitable" | {| class="wikitable" | ||
| Line 51: | Line 51: | ||
|n/a | |n/a | ||
|21. | |21. | ||
| | |Pantograph front | ||
|- | |- | ||
|2. | |2. | ||
|n/a | |n/a | ||
|22. | |22. | ||
| | |Main switch | ||
|- | |- | ||
|3. | |3. | ||
| | |Test fire alarm | ||
|23. | |23. | ||
| | |Light mode | ||
|- | |- | ||
|4. | |4. | ||
| | |Reset fire alarm | ||
|24. | |24. | ||
| | |Rise footrest | ||
|- | |- | ||
|5. | |5. | ||
| | |Engine room lighting | ||
|25. | |25. | ||
| | |Lower footrest | ||
|- | |- | ||
|6. | |6. | ||
| | |Activate spring brake | ||
|26. | |26. | ||
| | |Cabin activation | ||
|- | |- | ||
|7. | |7. | ||
| | |Release spring brake | ||
|27. | |27. | ||
| | |Emergency switch | ||
|- | |- | ||
|8. | |8. | ||
|Local brake | |Local brake | ||
|28. | |28. | ||
| | |Cruise control handle | ||
|- | |- | ||
|9. | |9. | ||
| | |Vigilane button | ||
|29. | |29. | ||
| | |Drive handle | ||
|- | |- | ||
|10. | |10. | ||
| | |Horn (High) | ||
|30. | |30. | ||
|Sanding | |Sanding | ||
|- | |- | ||
|11. | |11. | ||
| | |Cab lighting | ||
|31. | |31. | ||
|Brake releaser | |Brake releaser | ||
|- | |- | ||
|12. | |12. | ||
| | |Wiper | ||
|32. | |32. | ||
| | |Light dimming | ||
|- | |- | ||
|13. | |13. | ||
| | |Washer | ||
|33. | |33. | ||
| | |Control panel lighting | ||
|- | |- | ||
|14. | |14. | ||
| | |Control panel lighting | ||
|34. | |34. | ||
| | |Pulpit lights dimming | ||
|- | |- | ||
|15. | |15. | ||
| | |Pulpit lights dimming | ||
|35. | |35. | ||
| | |Service brake | ||
|- | |- | ||
|16. | |16. | ||
|Radiostop | |Radiostop | ||
|36. | |36. | ||
| | |Drive handle | ||
|- | |- | ||
|17. | |17. | ||
| | |Disable radio | ||
|37. | |37. | ||
| | |Horn | ||
|- | |- | ||
|18. | |18. | ||
| | |Enable radio | ||
|38. | |38. | ||
| | |Emergency brake | ||
|- | |- | ||
|19. | |19. | ||
| | |Pantograph back | ||
|39. | |39. | ||
| | |Brake assimilation | ||
|- | |- | ||
|20. | |20. | ||
| Line 149: | Line 149: | ||
|} | |} | ||
<span id="Postup_oživení_lokomotivy_(Cold_start)"></span> | <span id="Postup_oživení_lokomotivy_(Cold_start)"></span> | ||
== | ==Cold start procedure== | ||
<youtube>cywvQVxyeYA</youtube> | <youtube>cywvQVxyeYA</youtube> | ||
# | #Enter the cabin | ||
# | #Activating the cabin | ||
# | #Press the button to confirm alertness | ||
# | #Raise rear manifold | ||
# | #Turn on the HV switch and hold the button for a moment. | ||
# | #Turn on the radio station | ||
# | #Now, switch off the locomotive handbrake, where the button is located on the rear wall of the cab. | ||
# | #Switch the lights to the forward position. | ||
# | #Set the train's direction of travel - Forward | ||
# | #Switch and hold the brake in the "Reduce braking force" position and wait until the braking force is at 0%. | ||
#* | #*Click ZEW3 button on the radio to confirm the train is ready to the dispatcher. | ||
# | #Now it's time to move. Either use the controller (left) or the Num + key to add power. | ||
#Using the Num - key or reducing power on the controller will reduce the locomotive power and then we can brake the train or apply the electrodynamic brake. | #Using the Num - key or reducing power on the controller will reduce the locomotive power and then we can brake the train or apply the electrodynamic brake. | ||
Revision as of 18:13, 10 April 2023
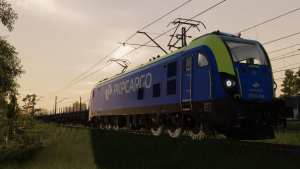
The electric locomotive is known as the ET25 Dragon, manufactured in Poland.

Locomotive in reality
Newag Dragon is a family of six-axle locomotives manufactured by the Polish manufacturer Newag Gliwice since 2009. Of the modifications offered, only electric DC locomotives are in service in 2015.
The locomotive was created as a joint project of the locomotive repairer Zakłady Naprawcze Lokomotyw Elektrycznych (ZNLE) (later Newag Gliwice) in cooperation with Instytut Elektrotechniki Warszawa and the design office EC Engineering. The locomotive was developed in response to specific Polish conditions, where operators prefer heavy trains, for which a six-axle locomotive is more suitable than the more common four-axle locomotives in Western Europe (e.g. Siemens EuroSprinter or Bombardier TRAXX).[1]
Locomotive parameters
| Traction | Electric | Maximum power | DC 5000 kW / AC&MS 7200 kW |
|---|---|---|---|
| Engine type | STX500-4A
ABB AMXL450 |
Maximum traction force | 375-450 kN |
| Number of motors | 6 | Maximum speed | 120 Km/h |
| Voltage | DC 3 kV
AC dual mode 15 kV & 25 kV MS triple mode 3 kV DC, 15 kV & 25 kV AC |
||
In-game locomotive

This electric locomotive in the game was added in the EA (Early Access) version, and players can run this locomotive as part of freight trains.
Serial numbers of locomotives that can be driven:
- EP25-002
Basic parameters of this locomotive
- Maximum speed 120 Km/h
- Can be driven up to 40 Km/h on diesel power
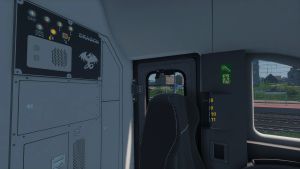
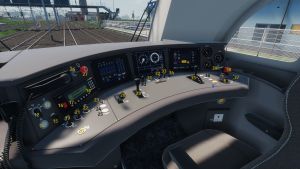
Interior of the locomotive


| 1. | n/a | 21. | Pantograph front |
| 2. | n/a | 22. | Main switch |
| 3. | Test fire alarm | 23. | Light mode |
| 4. | Reset fire alarm | 24. | Rise footrest |
| 5. | Engine room lighting | 25. | Lower footrest |
| 6. | Activate spring brake | 26. | Cabin activation |
| 7. | Release spring brake | 27. | Emergency switch |
| 8. | Local brake | 28. | Cruise control handle |
| 9. | Vigilane button | 29. | Drive handle |
| 10. | Horn (High) | 30. | Sanding |
| 11. | Cab lighting | 31. | Brake releaser |
| 12. | Wiper | 32. | Light dimming |
| 13. | Washer | 33. | Control panel lighting |
| 14. | Control panel lighting | 34. | Pulpit lights dimming |
| 15. | Pulpit lights dimming | 35. | Service brake |
| 16. | Radiostop | 36. | Drive handle |
| 17. | Disable radio | 37. | Horn |
| 18. | Enable radio | 38. | Emergency brake |
| 19. | Pantograph back | 39. | Brake assimilation |
| 20. | ETCS |
Cold start procedure
- Enter the cabin
- Activating the cabin
- Press the button to confirm alertness
- Raise rear manifold
- Turn on the HV switch and hold the button for a moment.
- Turn on the radio station
- Now, switch off the locomotive handbrake, where the button is located on the rear wall of the cab.
- Switch the lights to the forward position.
- Set the train's direction of travel - Forward
- Switch and hold the brake in the "Reduce braking force" position and wait until the braking force is at 0%.
- Click ZEW3 button on the radio to confirm the train is ready to the dispatcher.
- Now it's time to move. Either use the controller (left) or the Num + key to add power.
- Using the Num - key or reducing power on the controller will reduce the locomotive power and then we can brake the train or apply the electrodynamic brake.
Cold start procedure - Diesel engine
- Enter the cabin
- Activating the cabin
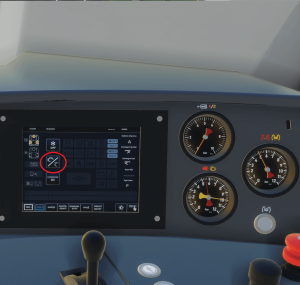
- On the right monitor - switch the motor/pantograph button
- Turn on the HV switch and hold the button for a moment.
- Turn on the radio station
- Now, switch off the locomotive handbrake, where the button is located on the rear wall of the cab.
- Switch the lights to the forward position.
- Set the train's direction of travel - Forward
- Switch and hold the brake in the "Reduce braking force" position and wait until the braking force is at 0%.
- Click ZEW3 button on the radio to confirm the train is ready to the dispatcher.
- Now it's time to move. Either use the controller (left) or the Num + key to add power.
- Using the Num - key or reducing power on the controller will reduce the locomotive power and then we can brake the train or apply the electrodynamic brake.
Locomotive faults
The locomotive is currently free of any faults.
Gallery
- Screenshots from the game (without zoom)
Reference
- [1] - Wikipedia link


