Jednostka elektryczna ED250 Pendolino: Difference between revisions
No edit summary |
No edit summary |
||
| Line 32: | Line 32: | ||
|Reset EVC/TELOC | |Reset EVC/TELOC | ||
|19. | |19. | ||
| | |Wyłącznik hamulca awaryjnego | ||
|- | |- | ||
|5. | |5. | ||
|Bypas harmonic measurements A | |Bypas harmonic measurements A | ||
|20. | |20. | ||
| | |Wyłącznik radiostopu | ||
|- | |- | ||
|6. | |6. | ||
|n/a | |n/a | ||
|21. | |21. | ||
| | |Wyłącznik systemu SIFA | ||
|- | |- | ||
|7. | |7. | ||
|Bypas harmonic measurements B | |Bypas harmonic measurements B | ||
|22. | |22. | ||
| | |Wyłącznik systemu NOTHALT | ||
|- | |- | ||
|8. | |8. | ||
|n/a | |n/a | ||
|23. | |23. | ||
| | | Wyłącznik LZB | ||
|- | |- | ||
|9. | |9. | ||
| | | Światła zasilane baterią | ||
|24. | |24. | ||
| | |Wyłącznik systemu PZB | ||
|- | |- | ||
|10. | |10. | ||
|Emergency ventilation | |Emergency ventilation | ||
|25. | |25. | ||
| | |Tryb oświetlenia przedniego | ||
|- | |- | ||
|11. | |11. | ||
| | |Oświetlenie przedziału pasażerskiego | ||
|26. | |26. | ||
| | |Tryb oświetlenia tylnego | ||
|- | |- | ||
|12. | |12. | ||
|Reset computer | |Reset computer | ||
|27. | |27. | ||
| | |Wyłącznik EVC | ||
|- | |- | ||
|13. | |13. | ||
|SIFA | |Test systemu SIFA | ||
|28. | |28. | ||
| | |Dezaktywacja SHP | ||
|- | |- | ||
|14. | |14. | ||
|LV board controls test | |LV board controls test | ||
|29. | |29. | ||
| | |Wyłącznik systemu MIREL | ||
|- | |- | ||
|15. | |15. | ||
| | |Próba hamulca | ||
| | | | ||
| | | | ||
| Line 93: | Line 93: | ||
|Radiostop | |Radiostop | ||
|47. | |47. | ||
| | |Oświetlenie kabiny | ||
|- | |- | ||
|31. | |31. | ||
| | |||
|48. | |Włącznik radia | ||
| 48. | |||
|Headlamp top | |Headlamp top | ||
|- | |- | ||
|32. | |32. | ||
|ZEW | |Przyciski wywołania selektywnego ZEW | ||
|49. | |49. | ||
| | |Światła przeciwmgłowe | ||
|- | |- | ||
|33. | | 33. | ||
| | |Rozłączenie sprzęgu | ||
|50. | |50. | ||
| | |Przyciemnienie oświetlenia | ||
|- | |- | ||
|34. | |34. | ||
| | |Sygnał dźwiękowy | ||
|51. | |51. | ||
| | |Tempomat | ||
|- | |- | ||
|35. | |35. | ||
|LZB command | |LZB command | ||
|52. | | 52. | ||
|SHP | |SHP | ||
|- | |- | ||
|36. | |36. | ||
|Release LZB | |Release LZB | ||
|53. | |53. | ||
| | |Aktywacja kabiny | ||
|- | |- | ||
|37. | |37. | ||
|LZB alerter | |LZB alerter | ||
|54. | |54. | ||
|Open main switch | |Open main switch | ||
|- | |- | ||
|38. | |38. | ||
| | |Piasecznica | ||
|55. | |55. | ||
| | |Wyłącznik szybki | ||
|- | |- | ||
|39. | |39. | ||
| | |Zasłona | ||
|56. | |56. | ||
|Booster | |Booster | ||
|- | |- | ||
|40. | |40. | ||
| | |Oświetlenie panelu kontrolnego | ||
|57. | |57. | ||
| | |Sekcja neutralna | ||
|- | |- | ||
|41. | |41. | ||
|Driver´s spotlight | |Driver´s spotlight | ||
|58. | |58. | ||
| | |Pantograf przód | ||
|- | |- | ||
|42. | |42. | ||
| | |Próba kontroli | ||
|59. | |59. | ||
| | |Pantograf tył | ||
|- | |- | ||
|43. | |43. | ||
| | |Regulacja podnóżka | ||
|60. | |60. | ||
| | |Wymuś działanie kompresów | ||
|- | |- | ||
|44. | |44. | ||
| | |Spryskiwacz | ||
|61. | |61. | ||
|Control circuits | |Control circuits | ||
|- | |- | ||
|45. | |45. | ||
| | |Wycieraczka | ||
|62. | |62. | ||
|Parking | |Parking | ||
|- | |- | ||
|46. | | 46. | ||
| | | Ogrzewanie szyby przedniej | ||
|63. | |63. | ||
|Forbid EDB (Electrodynamic braking) | |Forbid EDB (Electrodynamic braking) | ||
| Line 177: | Line 178: | ||
{| class="wikitable" | {| class="wikitable" | ||
|64. | |64. | ||
| | |Impuls świateł | ||
|76. | | 76. | ||
| | |Przyciemnienie świateł | ||
|- | |- | ||
|65. | |65. | ||
| | |Zakres napięcia | ||
|77. | |77. | ||
| | |Hamulec ręczny | ||
|- | |- | ||
|66. | |66. | ||
| | |Drzwi lewe | ||
|78. | |78. | ||
| | |Hamulec sprężynowy | ||
|- | |- | ||
|67. | |67. | ||
| | |Zamknij drzwi | ||
|79. | |79. | ||
| | |Wyłącz hamulec awaryjny | ||
|- | |- | ||
|68. | |68. | ||
| | |Drzwi prawe | ||
|80. | |80. | ||
| | |Klimatyzacja - recyrkulacja | ||
|- | |- | ||
|69. | |69. | ||
|Alarm | |Alarm | ||
|81. | |81. | ||
| | |Lampka pomocnika | ||
|- | |- | ||
|70. | |70. | ||
| | | | ||
|82. | |82. | ||
| | |Klimatyzacja | ||
|- | |- | ||
|71. | | 71. | ||
|Vigilance button | | Vigilance button | ||
|83. | |83. | ||
|Temperature | |Temperature | ||
|- | |- | ||
|72. | |72. | ||
|Direction control | |Direction control | ||
|84. | |84. | ||
|Fan speed | |Fan speed | ||
|- | |- | ||
|73. | | 73. | ||
|Drive handle | |Drive handle | ||
|85. | |85. | ||
|Emergency brake | |Emergency brake | ||
|- | |- | ||
|74. | |74. | ||
|Error acknowiedge | |Error acknowiedge | ||
|86. | |86. | ||
|Horn (low) | |Horn (low) | ||
|- | |- | ||
|75. | |75. | ||
|Pulpit lights dimming | | Pulpit lights dimming | ||
|87. | |87. | ||
|Vigilance button | |Vigilance button | ||
|} | |} | ||
==Cold start procedure== | ==Cold start procedure== | ||
#Click on the door and select the option to open the door. | #Click on the door and select the option to open the door. | ||
#Then enter the unit. | #Then enter the unit. | ||
| Line 246: | Line 248: | ||
#Raise the rear pick-up | #Raise the rear pick-up | ||
#Turn on the control circuits | #Turn on the control circuits | ||
#Turn on HV (main switch) | #Turn on HV (main switch) | ||
#*Now wait for the panel to read "12A" | #*Now wait for the panel to read "12A" | ||
#*Confirm to the dispatcher that the train is ready by pressing the ZEW3 button on the radio. | #*Confirm to the dispatcher that the train is ready by pressing the ZEW3 button on the radio. | ||
| Line 252: | Line 254: | ||
#Move the brake lever to the "Running" position and wait for the train to unbraking (Brake force must be 0%) | #Move the brake lever to the "Running" position and wait for the train to unbraking (Brake force must be 0%) | ||
#Switch off the spring brake | #Switch off the spring brake | ||
#Now it's time to move. Either use the controller (right) or the Num + key to add power. | #Now it's time to move. Either use the controller (right) or the Num + key to add power. | ||
#*At the stations we must not forget the possibility of opening the passenger door, which is visible at 04:26 | #*At the stations we must not forget the possibility of opening the passenger door, which is visible at 04:26 | ||
#*Press the open left door button and let the passengers board the train. | #*Press the open left door button and let the passengers board the train. | ||
| Line 267: | Line 269: | ||
</gallery> | </gallery> | ||
==Reference== | ==Reference== | ||
*[ | *[[wikipedia:New_Pendolino|<nowiki>[1]</nowiki>]] - Wikipedia link | ||
Revision as of 07:19, 28 March 2023
Ten artykuł dotyczy jednostki elektrycznej ED250 Pendolino
Jednostka w prawdziwym życiu
30 Maja 2011 r. Polskie Koleje Państwowe podpisały kontrakt z firmą Alstom na 20 pojazdów ETR 610. Nowo zakupione pociągi, znane dzisiaj jako ED250 zostały zakupione z myślą, by jeździły one po Centralnej Magistrali Kolejowej oraz na linii między Gdynią i Warszawą, Katowicami/Krakowem i Warszawą, a także Wrocławiem i Warszawą. Pierwsze pojazdy ETR 610 zostały dostarczone do Polski 12 Sierpnia 2013 r.
Testy prędkości odbywały się głównie na CMK. 16 Listopada odbyły się pierwsze testy. Pendolino osiągnęło prędkość 242 km/h. Następnego dnia, 17.11.2013, został pobity rekord prędkości. Jednostka osiągnęła prędkość 291 km/h. 24.11.2013 ustanowiono nowy rekord wynoszący 293 km/h.[1]
Jednostka w grze
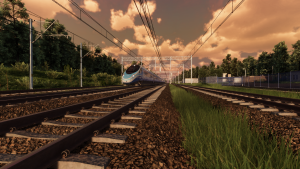
Jednostkę można było spotkać już podczas Playtestów, lecz została ona udostępniona graczom dopiero po wydaniu gry w Early Access. Obecnie realizuje rozkład między Katowicami i Warszawą oraz Warszawą i Krakowem, obecnie kończąc bieg na stacji Tunel.
Numery seryjne dostępnych wersji ED250:
- ED250-018
Parametry lokomotywy
- Maksymalna prędkość wynosi 250 km/h
Wnętrze lokomotywy
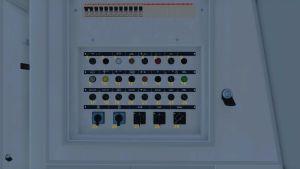
| 1. | Bateria | 16. | n/a |
| 2. | n/a | 17. | Bypass MCB |
| 3. | Oswietlenie korytarza | 18. | Bypass TCO |
| 4. | Reset EVC/TELOC | 19. | Wyłącznik hamulca awaryjnego |
| 5. | Bypas harmonic measurements A | 20. | Wyłącznik radiostopu |
| 6. | n/a | 21. | Wyłącznik systemu SIFA |
| 7. | Bypas harmonic measurements B | 22. | Wyłącznik systemu NOTHALT |
| 8. | n/a | 23. | Wyłącznik LZB |
| 9. | Światła zasilane baterią | 24. | Wyłącznik systemu PZB |
| 10. | Emergency ventilation | 25. | Tryb oświetlenia przedniego |
| 11. | Oświetlenie przedziału pasażerskiego | 26. | Tryb oświetlenia tylnego |
| 12. | Reset computer | 27. | Wyłącznik EVC |
| 13. | Test systemu SIFA | 28. | Dezaktywacja SHP |
| 14. | LV board controls test | 29. | Wyłącznik systemu MIREL |
| 15. | Próba hamulca |
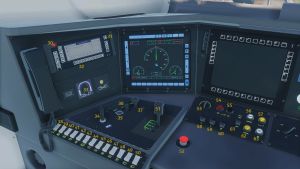
| 30. | Radiostop | 47. | Oświetlenie kabiny |
| 31. | Włącznik radia | 48. | Headlamp top |
| 32. | Przyciski wywołania selektywnego ZEW | 49. | Światła przeciwmgłowe |
| 33. | Rozłączenie sprzęgu | 50. | Przyciemnienie oświetlenia |
| 34. | Sygnał dźwiękowy | 51. | Tempomat |
| 35. | LZB command | 52. | SHP |
| 36. | Release LZB | 53. | Aktywacja kabiny |
| 37. | LZB alerter | 54. | Open main switch |
| 38. | Piasecznica | 55. | Wyłącznik szybki |
| 39. | Zasłona | 56. | Booster |
| 40. | Oświetlenie panelu kontrolnego | 57. | Sekcja neutralna |
| 41. | Driver´s spotlight | 58. | Pantograf przód |
| 42. | Próba kontroli | 59. | Pantograf tył |
| 43. | Regulacja podnóżka | 60. | Wymuś działanie kompresów |
| 44. | Spryskiwacz | 61. | Control circuits |
| 45. | Wycieraczka | 62. | Parking |
| 46. | Ogrzewanie szyby przedniej | 63. | Forbid EDB (Electrodynamic braking) |
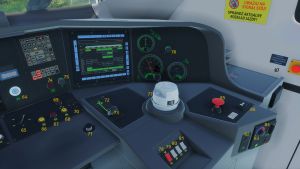
| 64. | Impuls świateł | 76. | Przyciemnienie świateł |
| 65. | Zakres napięcia | 77. | Hamulec ręczny |
| 66. | Drzwi lewe | 78. | Hamulec sprężynowy |
| 67. | Zamknij drzwi | 79. | Wyłącz hamulec awaryjny |
| 68. | Drzwi prawe | 80. | Klimatyzacja - recyrkulacja |
| 69. | Alarm | 81. | Lampka pomocnika |
| 70. | 82. | Klimatyzacja | |
| 71. | Vigilance button | 83. | Temperature |
| 72. | Direction control | 84. | Fan speed |
| 73. | Drive handle | 85. | Emergency brake |
| 74. | Error acknowiedge | 86. | Horn (low) |
| 75. | Pulpit lights dimming | 87. | Vigilance button |
Cold start procedure
- Click on the door and select the option to open the door.
- Then enter the unit.
- Click the left mouse button and close the door.
- On the panel, turn on the batteries, the car lights and select the lights.
- Click on the driver's seat, sit behind the console.
- Now, activate the cab
- Confirm vigilance button
- Raise the rear pick-up
- Turn on the control circuits
- Turn on HV (main switch)
- Now wait for the panel to read "12A"
- Confirm to the dispatcher that the train is ready by pressing the ZEW3 button on the radio.
- Set the train direction - Forward
- Move the brake lever to the "Running" position and wait for the train to unbraking (Brake force must be 0%)
- Switch off the spring brake
- Now it's time to move. Either use the controller (right) or the Num + key to add power.
- At the stations we must not forget the possibility of opening the passenger door, which is visible at 04:26
- Press the open left door button and let the passengers board the train.
- After the passengers have finished boarding, we press the door lock button and we can leave the station.
Unit faults
The unit is currently free of any malfunctions.
Gallery
- Screenshots from the game (without zoom)
Reference
- [1] - Wikipedia link


