DLC CD 163/es: Difference between revisions
Updating to match new version of source page |
Updating to match new version of source page |
||
| (7 intermediate revisions by the same user not shown) | |||
| Line 53: | Line 53: | ||
==Procedimiento de arranque "en frío" de la locomotora== | ==Procedimiento de arranque "en frío" de la locomotora== | ||
#n/a | #n/a | ||
</div> | |||
<div lang="en" dir="ltr" class="mw-content-ltr"> | |||
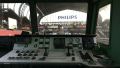
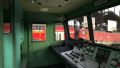
== Locomotive controls == | |||
[[File:163 cab tut1.png|center|thumb|[[File:163 cab tut2.png|center|frameless]][[File:163 cab tut3.png|center|frameless]][[File:163 cab tut4.png|center|frameless]]]] | |||
{| class="wikitable" | |||
|1. | |||
|Engine room lighting | |||
|35. | |||
|Instrument lighting | |||
|- | |||
|2. | |||
|Corridor lighting | |||
|36. | |||
|Cab lighting | |||
|- | |||
|3. | |||
|Undercarriage lighting | |||
|37. | |||
|Headlamp top (Used in CZ) | |||
|- | |||
|4. | |||
|Power supply (115 V) | |||
|38. | |||
|Direction control | |||
|- | |||
|5. | |||
|Battery | |||
|39. | |||
|Vigilance button | |||
|- | |||
|6. | |||
|Electronics power breaker | |||
|40. | |||
|Drive handle | |||
|- | |||
|7. | |||
|Battery breaker | |||
|41. | |||
|Electrodynamic brake | |||
|- | |||
|8. | |||
|Manual brake | |||
|42. | |||
|Control mode | |||
|- | |||
|9. | |||
|Pantograph front | |||
|43. | |||
|Frequency | |||
|- | |||
|10. | |||
|Pantograph back | |||
|44. | |||
|Driving mode | |||
|- | |||
|11. | |||
|Whistle | |||
|45. | |||
|Relative power | |||
|- | |||
|12. | |||
|Fan | |||
|46. | |||
|ARR keyboard | |||
|- | |||
|13. | |||
|Control panel lighting | |||
|47. | |||
|Whistle | |||
|- | |||
|14. | |||
|Diagnostic panel | |||
|48. | |||
|Driving through speed limit | |||
|- | |||
|15. | |||
|LVZ control (Only used in CZ) | |||
|49. | |||
|Brake delay settings | |||
|- | |||
|16. | |||
|LVZ cabin (Only used in CZ) | |||
|50. | |||
|Sanding | |||
|- | |||
|17. | |||
|Passive driving mode | |||
|51. | |||
|Brake releaser | |||
|- | |||
|18. | |||
|Headlamp top (Used in PL) | |||
|52. | |||
|Local brake | |||
|- | |||
|19. | |||
|Light dimming (Used in PL) | |||
|53. | |||
|Service brake | |||
|- | |||
|20. | |||
|Headlamp left (Used in PL) | |||
|54. | |||
|Decouple | |||
|- | |||
|21. | |||
|Headlamp right (Used in PL) | |||
|55. | |||
|Increase shunting power | |||
|- | |||
|22. | |||
|Cabin activation | |||
|56. | |||
|Decrease shunting power | |||
|- | |||
|23. | |||
|Train heating | |||
|57. | |||
|Alerter dimming | |||
|- | |||
|24. | |||
|Emergency drive | |||
|58. | |||
|SHP dimming | |||
|- | |||
|25. | |||
|Main switch | |||
|59. | |||
|Grounding disconnector | |||
|- | |||
|26. | |||
|Open main switch | |||
|60. | |||
|Control panel lighting | |||
|- | |||
|27. | |||
|Ventilators | |||
|61. | |||
|Motor disconnector | |||
|- | |||
|28. | |||
|Compressor II. | |||
|62. | |||
|Cabin heating | |||
|- | |||
|29. | |||
|Compressor I. | |||
|63. | |||
|Diagnostics | |||
|- | |||
|30. | |||
|Pantographs | |||
|64. | |||
|Heating drainage | |||
|- | |||
|31. | |||
|Signal light back left (Used in CZ) | |||
|65. | |||
|Windscreen heating | |||
|- | |||
|32. | |||
|Signal light back right (Used in CZ) | |||
|66. | |||
|Horn | |||
|- | |||
|33. | |||
|Signal light front left (Used in CZ) | |||
|67. | |||
|Sanding | |||
|- | |||
|34. | |||
|Signal light front right (Used in CZ) | |||
| | |||
| | |||
|} | |||
</div> | </div> | ||
| Line 61: | Line 237: | ||
<div lang="en" dir="ltr" class="mw-content-ltr"> | <div lang="en" dir="ltr" class="mw-content-ltr"> | ||
== Control mode / Driving mode / Relative power == | |||
R = manual (enter relative traction)<br> | |||
A = automatic (enter desired speed)<br> | |||
ZK = automatic test<br> | |||
<br> | |||
=== Drive mode switch === | |||
P = parking | |||
<br> | |||
V = coasting - positive proportional thrust blocked | |||
<br> | |||
J = driving | |||
<br> | |||
S = consent - positive proportional thrust enabled | |||
<br> | |||
The "consent" position must be used for initial start-up (and the switch must be held in this position until a speed of 1.5 km/h is reached). It is also necessary to use this position to unblock positive proportional thrust again after manual intervention in the control using the EDB controller or the continuous train brake controller. | |||
<br> | |||
=== Relative power === | |||
Proportional thrust limitation in automatic mode | |||
<br> | |||
1-12 = thrust setting | |||
<br> | |||
1 = EDB disabled | |||
<br> | |||
7-12 = EDB power is 100% [https://wiki.control.fel.cvut.cz/mediawiki/images/8/8a/Bp_2019_sturc_martin.pdf <nowiki>[2]</nowiki>] | |||
<br> | |||
== Axcle counter / Relative power == | |||
Axcle counter selection is used to set the length of the train in the speed controller (cruise control), with one axle corresponding to a length of six meters (and a maximum of 170 axles can be set). | |||
<br> | |||
Relative power controller controls the pulse converters of the traction motors' and excitation traction motors based on the relative power requirement. It also controls the converters of auxiliary drives (traction motor cooling fans, etc.). | |||
</div> | </div> | ||
| Line 75: | Line 275: | ||
File:163 render3.jpg | File:163 render3.jpg | ||
</gallery> | </gallery> | ||
</div> | </div> | ||
| Line 229: | Line 332: | ||
==Reference== | ==Reference== | ||
*[https://cs.wikipedia.org/wiki/Lokomotiva_163 <nowiki>[1]</nowiki>] – Wikipedia link (CZ) | *[https://cs.wikipedia.org/wiki/Lokomotiva_163 <nowiki>[1]</nowiki>] – Wikipedia link (CZ) | ||
*[https://wiki.control.fel.cvut.cz/mediawiki/images/8/8a/Bp_2019_sturc_martin.pdf <nowiki>[2]</nowiki>] – CVUT (CZ) | |||
</div> | </div> | ||
Latest revision as of 01:15, 23 January 2026
En esta página faltan información y detalles debido a la falta de disponibilidad, lo que significa que dicha información puede no ser precisa al 100% .

La locomotora en la realidad
La locomotora de la serie 163, derivada de la serie 363, se basa en la necesidad de operar en líneas con tensión de 3 kV CC. A principios de la década de 1980, la situación en el transporte ferroviario comenzó a cambiar, dado que en 1985 debían eliminarse gradualmente las locomotoras de las series 140 y 141 y no había suficientes unidades de reemplazo. Esto llevó a Škoda a poner en marcha una nueva serie de locomotoras capaces de funcionar con tracción DC. Aunque nunca se construyó un prototipo de la serie 163, se utilizaron prototipos de las locomotoras ES 499.1 de dos sistemas (la actual serie 363) para su desarrollo. Por lo tanto, las locomotoras de la serie 163 forman parte de la llamada segunda generación de locomotoras Škoda.
La producción de las locomotoras de la serie 163 tuvo lugar entre 1984 y 1986 (designación de fábrica 71E) y más tarde entre 1991 y 1992 (99E), en la empresa Škoda en Pilsen en cooperación con ČKD Polovodiče. Además de las locomotoras de nueva producción, se construyeron varias unidades de la serie 163 como resultado del cambio de chasis de la serie 363 a la serie 162 entre 1993 y 2008. Estas locomotoras se utilizan en la República Checa, Eslovaquia y anteriormente en Italia para transportar trenes de pasajeros y mercancías. Al mismo tiempo, las locomotoras de la serie 163 siguen activas y cumplen con éxito su papel de locomotoras de línea universal. Algunas de estas locomotoras fueron arrendadas previamente a Polonia, desde donde regresaron a la República Checa a finales de 2015.
Parámetros de la locomotora
| Tracción | Eléctrica | Potencia máxima | 3480 kW |
|---|---|---|---|
| Tipo de motor | AL 4562 FiR | Velocidad máxima | 120 Km/h |
| Voltaje | 3kV AC | Peso | 85 t |
La locomotora en el juego

El desarrollo de esta locomotora fue anunciado el 12.12.2023 y “estará disponible como contenido descargable (DLC) en el juego.
Números de serie que se pueden conducir:
- 163 041-7
Parámetros básicos de esta locomotora
- Velocidad máxima de 120 Km/h
- La locomotora carece de ETCS.
Procedimiento de arranque "en frío" de la locomotora
- n/a
Locomotive controls


| 1. | Engine room lighting | 35. | Instrument lighting |
| 2. | Corridor lighting | 36. | Cab lighting |
| 3. | Undercarriage lighting | 37. | Headlamp top (Used in CZ) |
| 4. | Power supply (115 V) | 38. | Direction control |
| 5. | Battery | 39. | Vigilance button |
| 6. | Electronics power breaker | 40. | Drive handle |
| 7. | Battery breaker | 41. | Electrodynamic brake |
| 8. | Manual brake | 42. | Control mode |
| 9. | Pantograph front | 43. | Frequency |
| 10. | Pantograph back | 44. | Driving mode |
| 11. | Whistle | 45. | Relative power |
| 12. | Fan | 46. | ARR keyboard |
| 13. | Control panel lighting | 47. | Whistle |
| 14. | Diagnostic panel | 48. | Driving through speed limit |
| 15. | LVZ control (Only used in CZ) | 49. | Brake delay settings |
| 16. | LVZ cabin (Only used in CZ) | 50. | Sanding |
| 17. | Passive driving mode | 51. | Brake releaser |
| 18. | Headlamp top (Used in PL) | 52. | Local brake |
| 19. | Light dimming (Used in PL) | 53. | Service brake |
| 20. | Headlamp left (Used in PL) | 54. | Decouple |
| 21. | Headlamp right (Used in PL) | 55. | Increase shunting power |
| 22. | Cabin activation | 56. | Decrease shunting power |
| 23. | Train heating | 57. | Alerter dimming |
| 24. | Emergency drive | 58. | SHP dimming |
| 25. | Main switch | 59. | Grounding disconnector |
| 26. | Open main switch | 60. | Control panel lighting |
| 27. | Ventilators | 61. | Motor disconnector |
| 28. | Compressor II. | 62. | Cabin heating |
| 29. | Compressor I. | 63. | Diagnostics |
| 30. | Pantographs | 64. | Heating drainage |
| 31. | Signal light back left (Used in CZ) | 65. | Windscreen heating |
| 32. | Signal light back right (Used in CZ) | 66. | Horn |
| 33. | Signal light front left (Used in CZ) | 67. | Sanding |
| 34. | Signal light front right (Used in CZ) |
Fallos de la locomotora
- n/a
Control mode / Driving mode / Relative power
R = manual (enter relative traction)
A = automatic (enter desired speed)
ZK = automatic test
Drive mode switch
P = parking
V = coasting - positive proportional thrust blocked
J = driving
S = consent - positive proportional thrust enabled
The "consent" position must be used for initial start-up (and the switch must be held in this position until a speed of 1.5 km/h is reached). It is also necessary to use this position to unblock positive proportional thrust again after manual intervention in the control using the EDB controller or the continuous train brake controller.
Relative power
Proportional thrust limitation in automatic mode
1-12 = thrust setting
1 = EDB disabled
7-12 = EDB power is 100% [2]
Axcle counter / Relative power
Axcle counter selection is used to set the length of the train in the speed controller (cruise control), with one axle corresponding to a length of six meters (and a maximum of 170 axles can be set).
Relative power controller controls the pulse converters of the traction motors' and excitation traction motors based on the relative power requirement. It also controls the converters of auxiliary drives (traction motor cooling fans, etc.).
Galería de imágenes
- Capturas del juego
-

-
-

Información del DLC
| Fecha del anuncio: | 12.12.2023 |
| Fecha de distribución: | n/a |
| Desarrollador: | Javor (CZ) |
| Precio: | n/a |
| El DLC incluirá: | 163 041-7 |
Referencia
- [1] – Enlace a Wikipedia (CZ)
DLC Info
| Model author: | Javor (CZ) |
| Date of announcement: | 12.12.2023 |
| Release date: | 25.01.2026 |
| Price: | 14 € |
| DLC will include: | 1 model / 11 reskins |
| Link to store: | Buy here |